
Exam-guru help
Summary:
Basic operations
How to register
3. Verify email address by opening your email from Exam-guru and clicking on the link.
I have not received my verification email after
registering. What do I do?
· Fig 25 Invitation email not received
How to login
3. Fig 3.2 Login screen with email verification message
How to buy credits without opening the Exam-guru
Silverlight application
How to buy credit from within the Exam-guru
Silverlight application
3. Fig 6 Silverlight - Account tab
How to open the Exam-guru Silverlight application
1. Fig 1 Home screen (Make sure that the "Exam Manager" option is selected)
2. (Download Silverlight if this hasn’t been installed to your browser yet)
Exam-Guru Silverlight Application
What does the writer tab do? Where do I write exams?
· Fig 5 Silverlight - Exam manager
· Fig 9 Silverlight - Writer tab
· Fig 19 Silverlight - Writer tab - Write an exam
· Fig 20 Silverlight - Writer tab - Question group step
· Fig 21 Silverlight - Writer tab - Question
· Fig 22 Silverlight - Writer tab - Last question
· Fig 23 Silverlight - Writer tab - After clicking stop button
· Fig 24 Silverlight - Exam result
What does the account tab do? Where do I manage my
account? Where do I manage my Training Institute(s)?
· Fig 5 Silverlight - Exam manager
· Fig 6 Silverlight - Account tab - Selected a Training Institute from the list
· Fig 8 Silverlight - Account tab - Selected a Training Institute and click Manage Individuals
· Fig 10.1 Silverlight - Categories tab
· Fig 10.2 Silverlight - Categories tab - Clicked on invite button
What does the “Categories, Courses and Invitations”
tab do? How do I group my exams into a hierarchy? How do I invite a student to
write an exam?
· Fig 5
· Fig 11 Silverlight - Exams tab
· Fig 12 Silverlight - Exams tab - Clicked on Add Group button
· Fig 13 Silverlight - Exams tab - Clicked on Add Question button
· Fig 14 Silverlight - Exams tab - Clicked on Add Question button - Question types
· Fig 15 Silverlight - Exams tab - Clicked on Add Question - Multiple-choice
· Fig 16 Silverlight - Exams tab - Clicked on Add Question button - Multiple correct-choices
· Fig 17 Silverlight - Exams tab - Clicked on Add Question button - Match the column
· Fig 18 Silverlight
- Exams tab - Clicked on Add Question button - Input type
What does the
“Training” tab do? How do I create training content? How do I invite students
to view Training content? How do I view Training Content?
·
Fig 26 Silverlight - Training
tab
Exam-guru screenshots
Fig 1. Home screen: Note the Log In and Register links at the top.
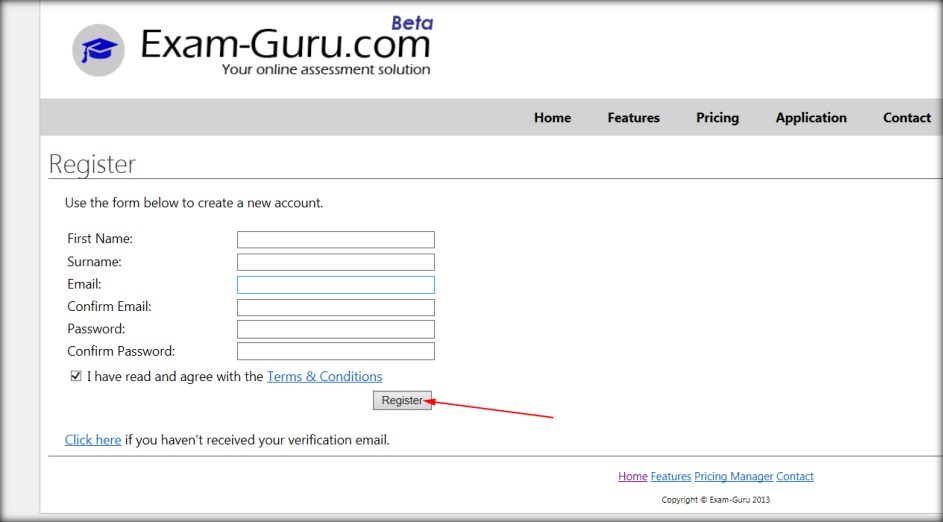
Fig 2. Register screen. After entering the fields and agreeing to the “terms & conditions”, the user can click on the Register button. Upon registration a confirmation email will be sent to the user. The user will need to click on the link in the verification email before being able to log into the system.
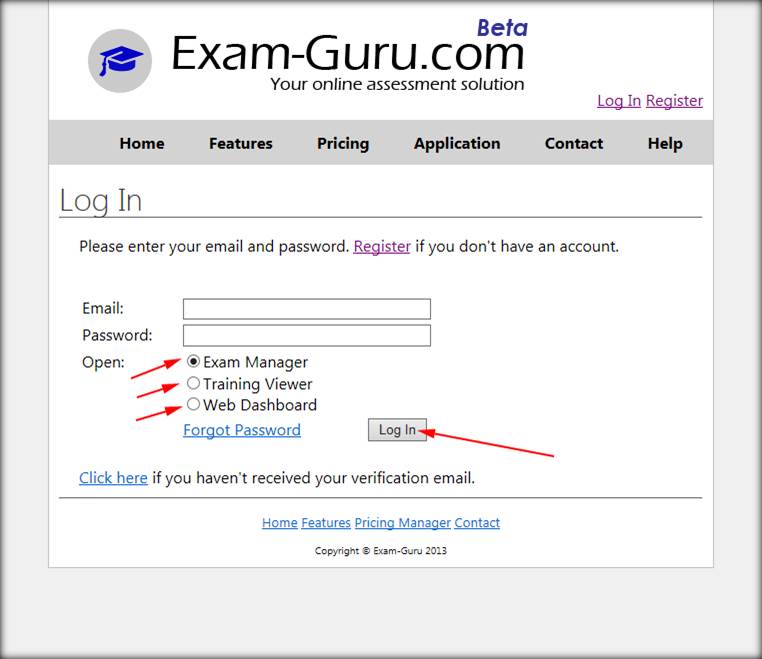
Fig 3.1. Log In screen.
·
Exam
manager – This option opens up the Silverlight application after logging in.
·
Training
Viewer – This option opens up the Training Viewer. The Training Viewer is a
web-based section that displays training content. This section can also be
viewed on most smartphones/tablets.
·
Web
Dashboard – This option displays all the available commands in the Application
tab.
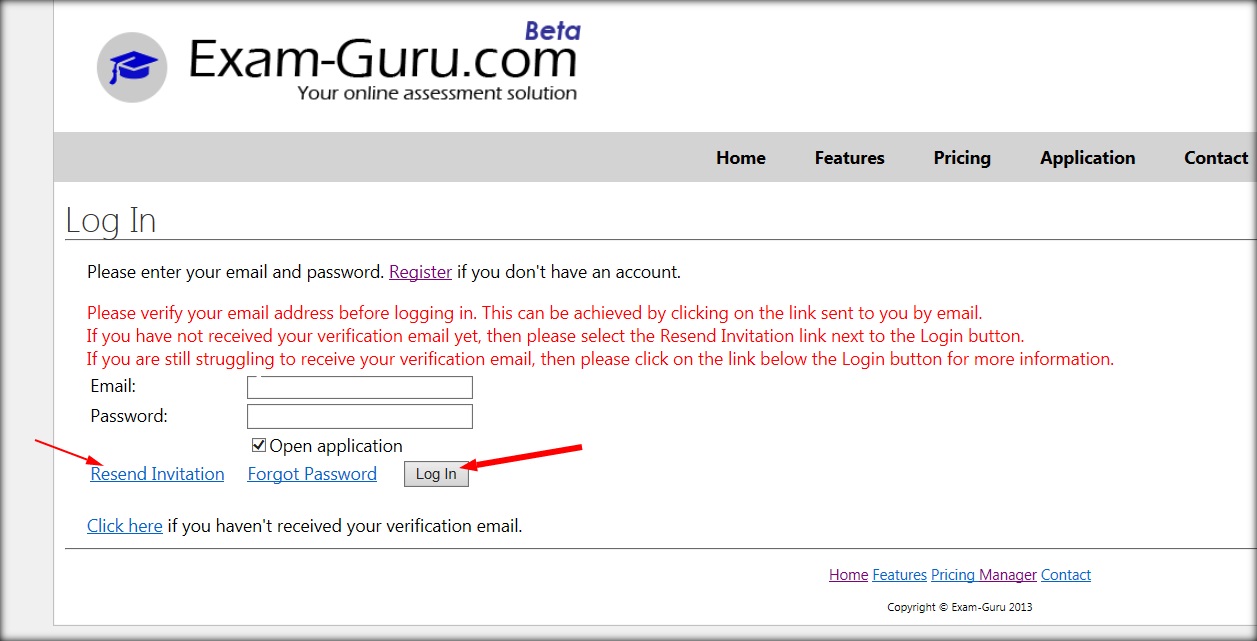
Fig 3.2. Log In screen – The message in red (above) gets displayed when the entered email address hasn’t been verified yet.
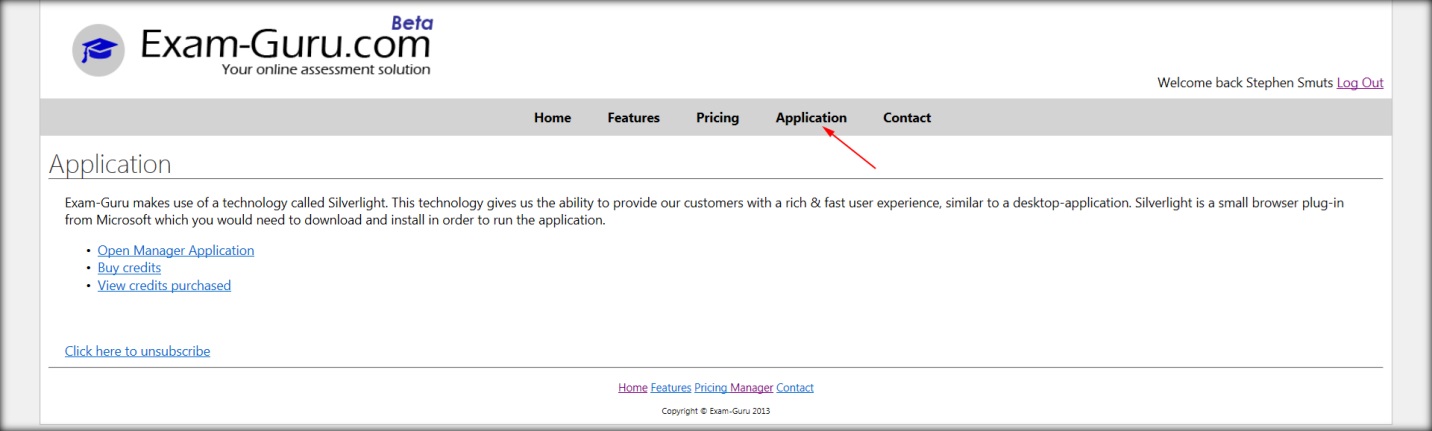
Fig4. Application tab
· Open Manager Application
o This opens the Silverlight Application. The Silverlight Application is used to manage and write exams.
· Buy Credits
o This is an area to buy credits for writing exams. Exams may also be purchased from within the Silverlight Exam Application.
· View Credits purchased
o This is an area where the user may view a history of credits purchased as well as some basic information on exams which have been written by students.
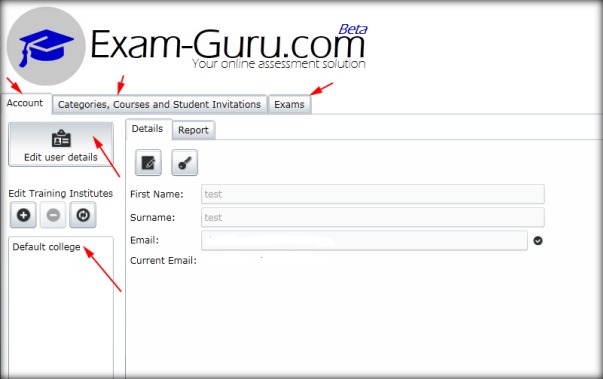
Fig 5. Silverlight Exam manager.
· Writer tab
o This is an area for writing exams.
o This tab will only be enabled when the student has been exams which need to be written.
· Account tab
o User details can be managed here.
o Training Institutes can be managed here.
o User reports can be viewed on the Report tab when the Edit User Details button has been clicked.
o Training Institute Reports can be viewed on the Report tab after selecting a Training Institute.
· Categories, Courses and Student Invitations tab
o This is an area for managing hierarchies of Exam Categories & Courses.
o Student Invitations to write exams can be sent for an entire course here.
· Exams tab – This is an area for creating and editing Exams.
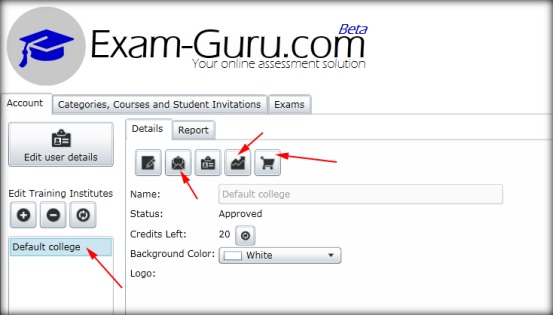
Fig 6. Account tab – Selected a
Training Institute from the list - This area is for managing Account
Information and Training Institutes.
To edit the Account information, click on the “Edit user details” button on the
top left corner and then click on the Edit button.
After selecting a “Training Institute” from the list on the left hand side of the screen, the following is available:
· Manage Training Institute configuration.
· To invite instructors to participate in a Training Institute, click on the Invite button.
· Click on the Upgrade button to change the Training Institute to an Advanced(Paid) Training Institute, read through the Pricing tab on the main web-site to see details on what benefits are available on the Advanced Training Institute Exams.
· Buy Credits button – Credits can be purchased for the Training Institute here. This button is enabled on Advanced(Paid) Training Institutes. Credits are spent when students write exams on Advanced(Paid) Training Institutes.

Fig 7. Account tab – Selected a Training Institute on
Fig 6 – Clicked on Invite button – This is to invite Instructors to
join the Training Institute.
Email addresses can be entered here. Every email address needs to be on a
separate line.
After clicking on the “Send” button an invitation email will be sent to the
listed email addresses.
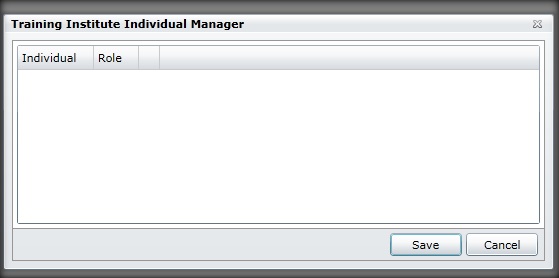
Fig 8. Account tab – Selected Training Institute in
Fig 6 – Clicked on Manage Individuals button in Fig 6.
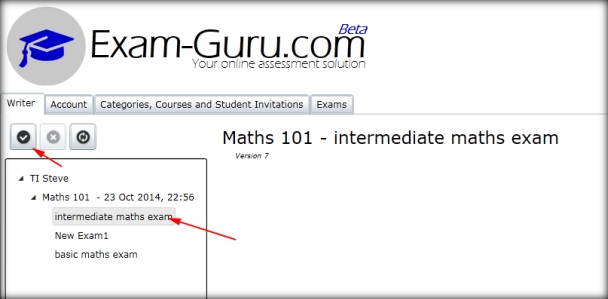
Fig 9. Writer tab – This is an area for writing exams. Exams that a student has been invited to will be listed here. The student will click on the Write button to write the exam.
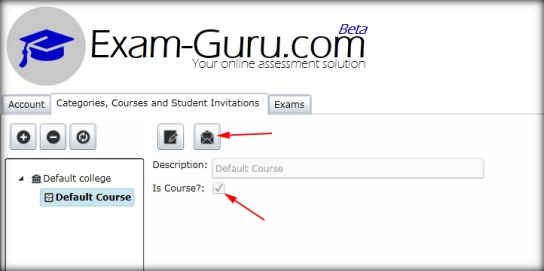
Fig 10.1. Categories tab. This is for managing
Categories and Courses. Exams can be allocated to courses via the Exams tab.
Please check the “Is Course?” checkbox if the selected item is a course.
You can invite students to write exams within a course or category by clicking
on the Invite button.

Fig 10.2. Categories tab - Clicked on Invite button.
This is to invite students to write the exams in a courses or category. Please
note that an expiry date can be set on the invitations.
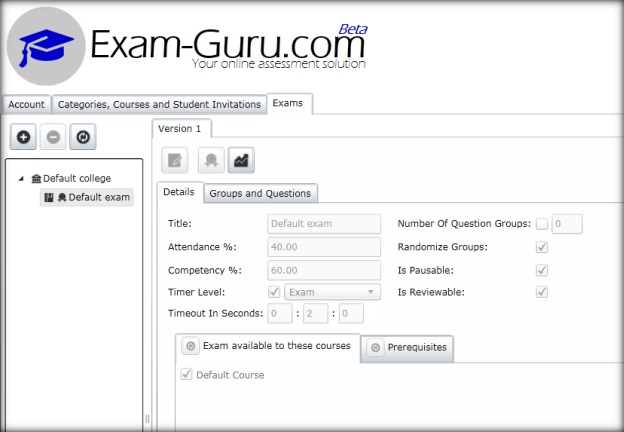
Fig 11. Exams tab. This is for creating and managing
exams.
The hierarchy on the left shows Training Institutes and exams related to the
Training Institute.
After filling in all fields and adding Groups and Questions: Select an
Associated course (tabs on the right of the screen), click on Save & then
on Publish. Published Exam versions may not be edited; a new version of the
exam will be created for editing. Once an exam has been published students can
be invited to write the exam.
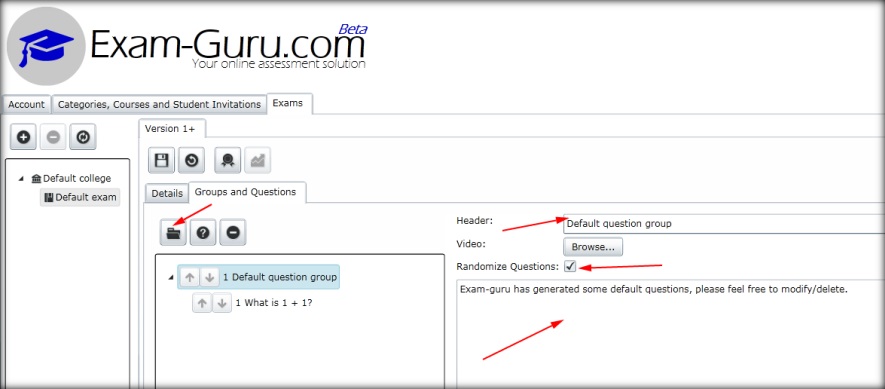
Fig 12. Exams tab – Clicked on Add Group.
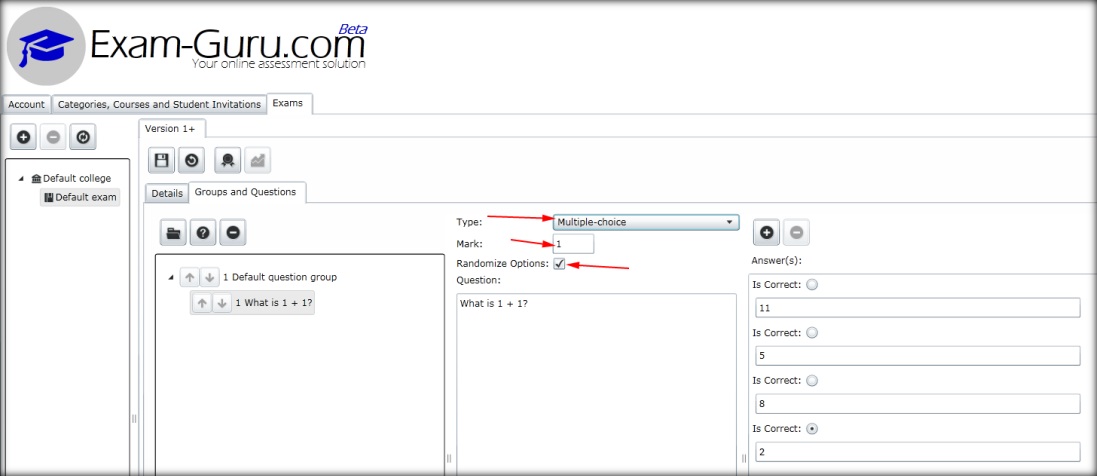
Fig 13. Exams tab – Clicked on Add Question.
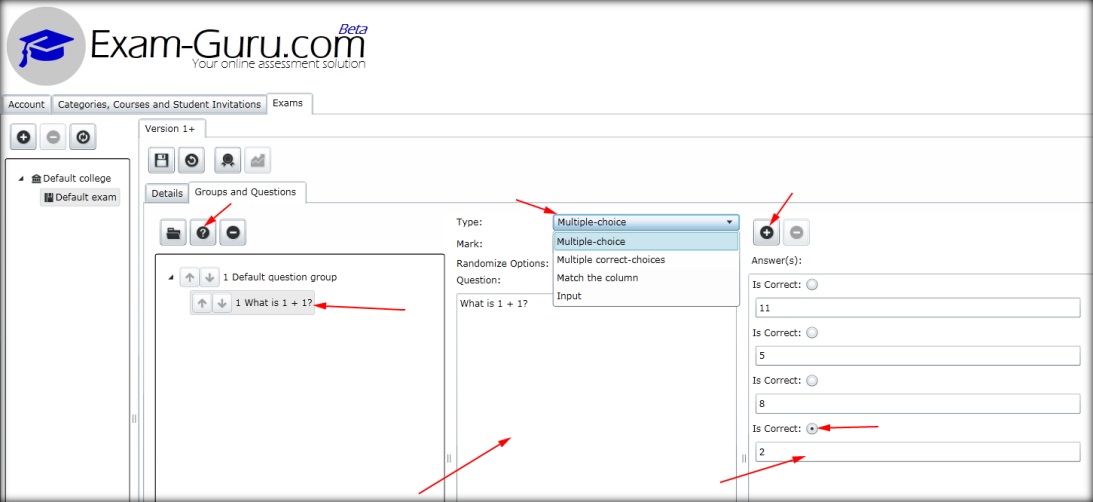
Fig 14. Exams tab – Clicked on Add Question – Question
types
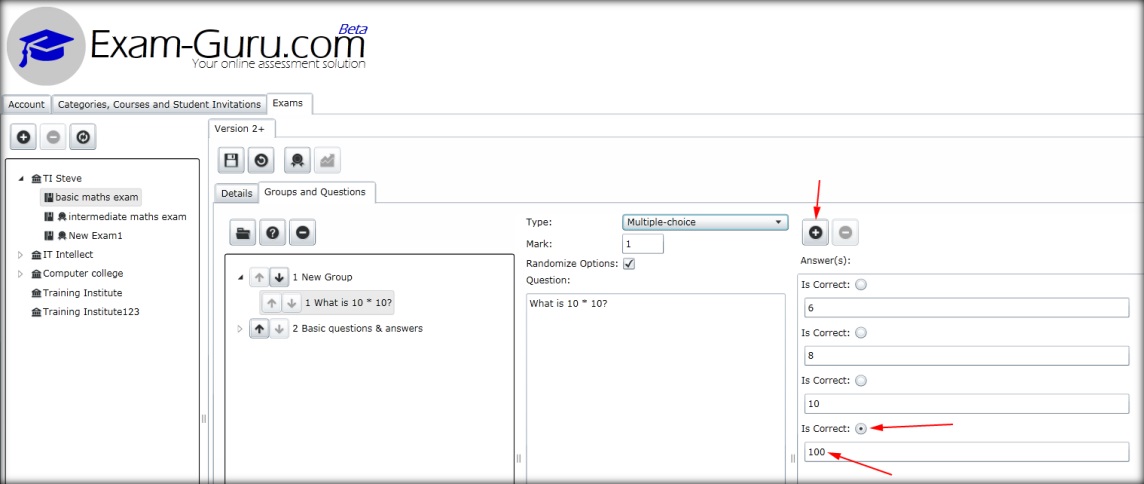
Fig 15. Exams tab – Clicked on Add Question –
Multiple-choice
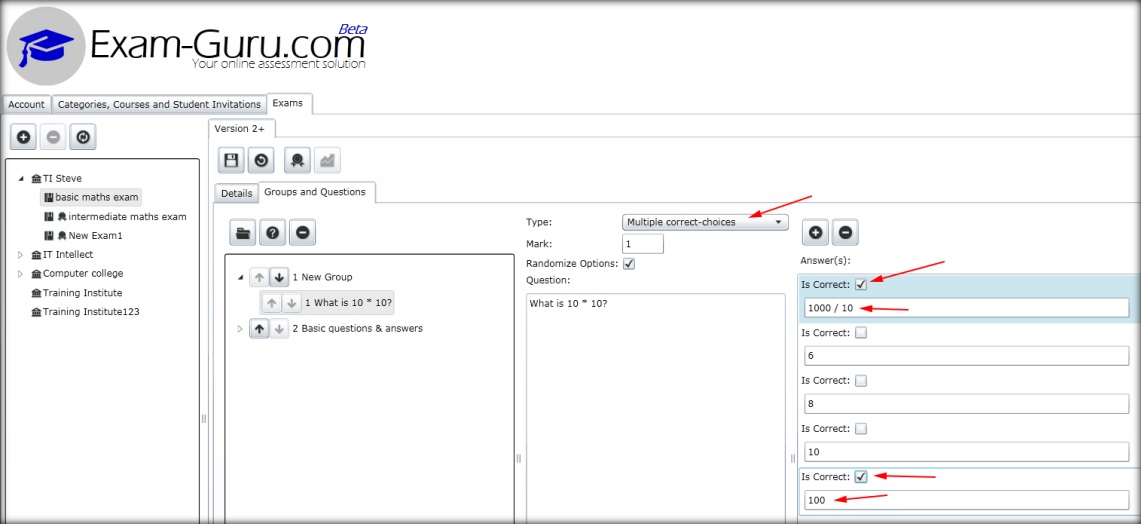
Fig 16. Exams tab – Clicked on Add Question – Multiple
correct-choices
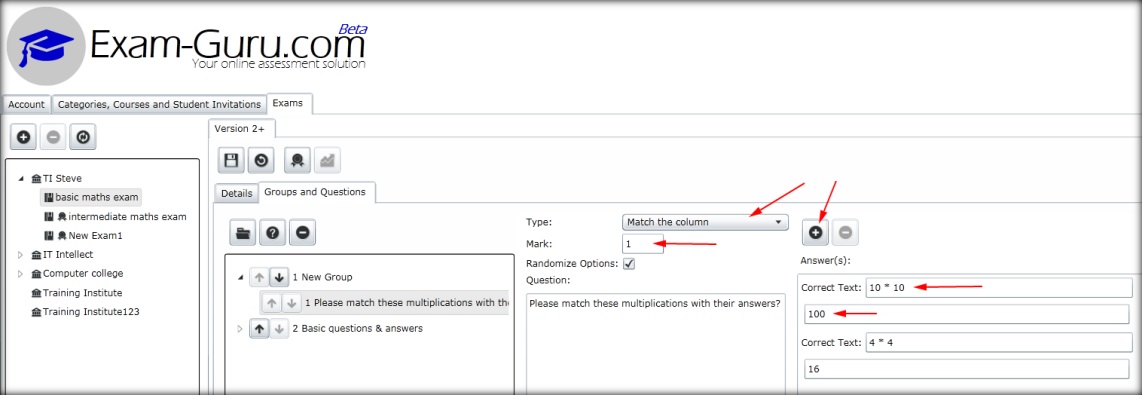
Fig 17. Exams tab – Clicked on Add Question – Match
the column
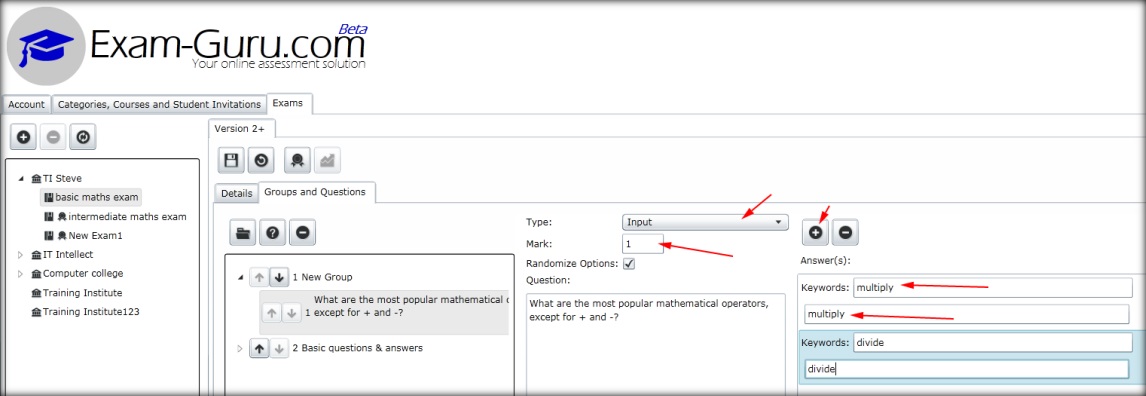
Fig 18. Exams tab – Clicked on Add Question – Input
Type
Writing an exam:
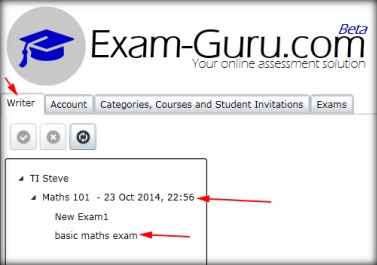
Fig 19. Writer tab – select an exam and click on the write exam button.
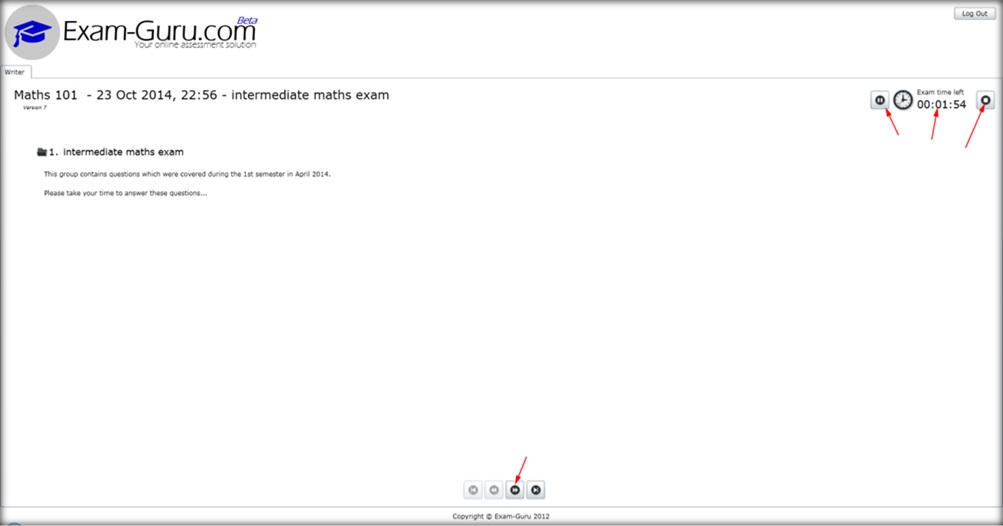
Fig 20. Question group step – this is a step explaining the group of questions which are being asked.
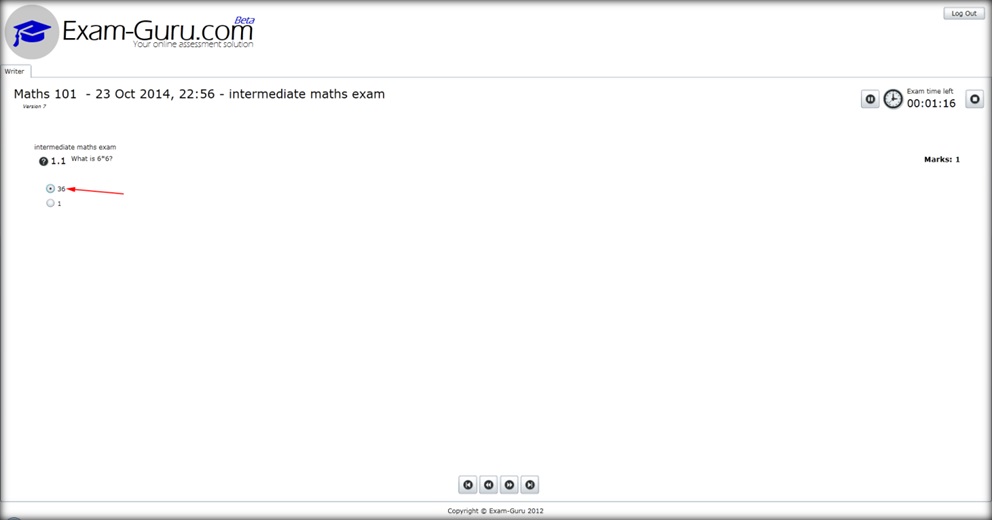
Fig 21. Question
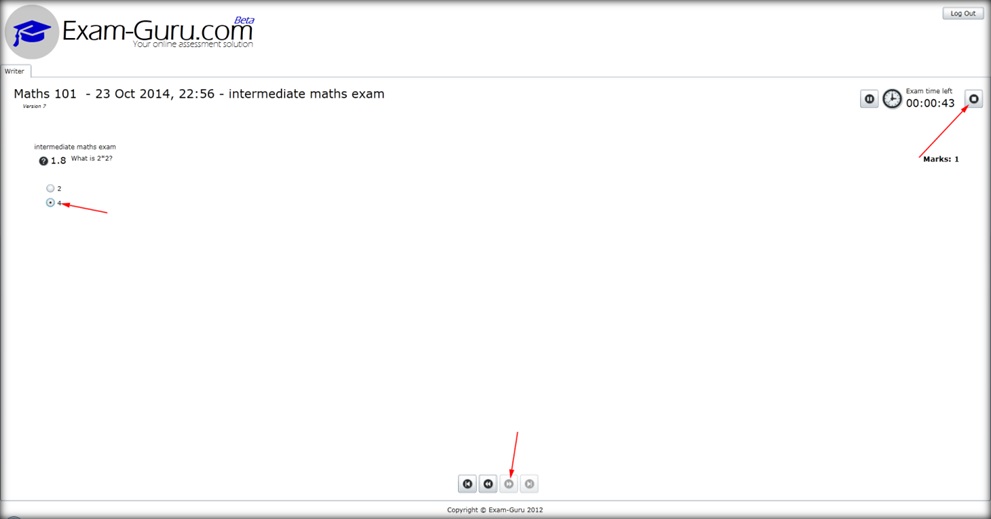
Fig 22. Last question. Notice how the “Next” button is disabled. Click on the Stop button to stop the exam.
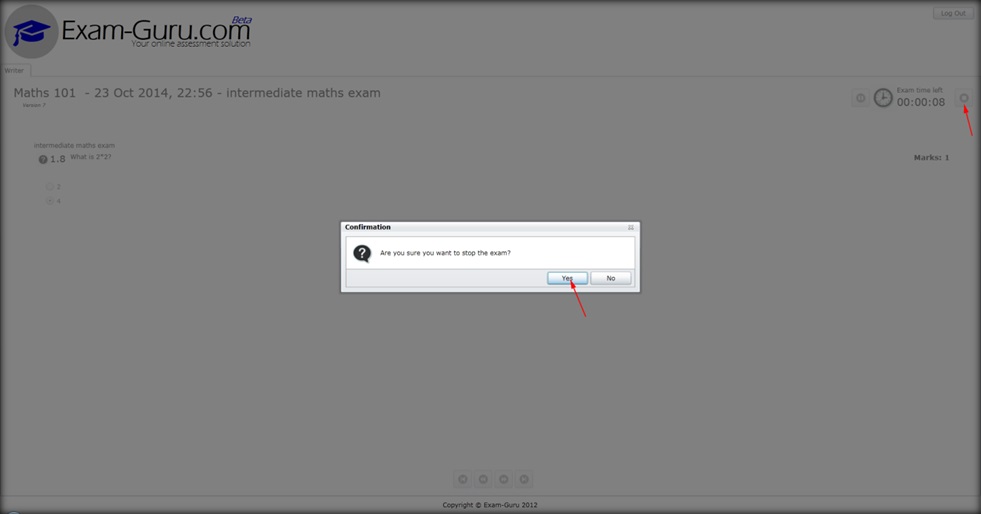
Fig 23. After clicking on the Stop button in Fig 22, a confirmation will be presented.
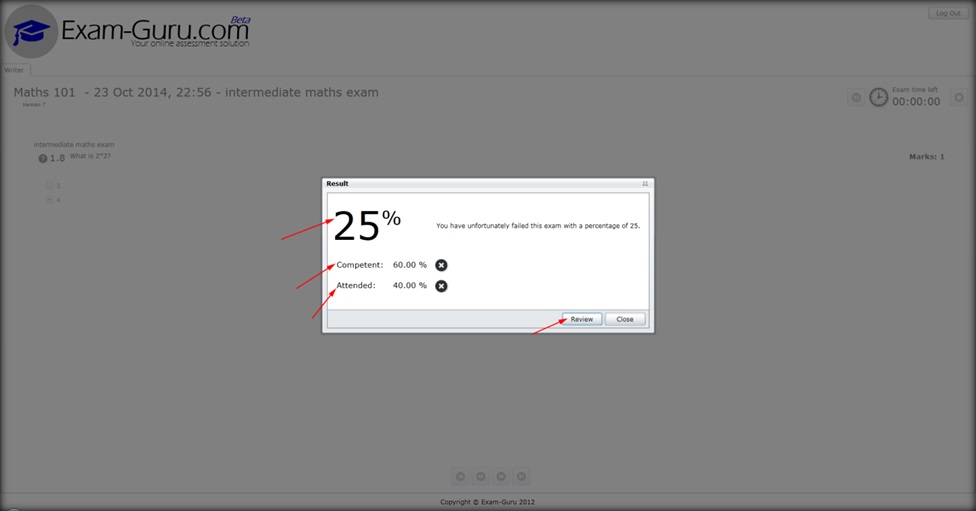
Fig 24. Exam results.
Pass rate – Student has passed the exam.
Attendance percentage – Student hasn’t passed the exam, but has achieved a mark that indicates that they have attended the course.
Note that the student can click on the Review button to see the correct answers. This option is configurable in the Exam tab.
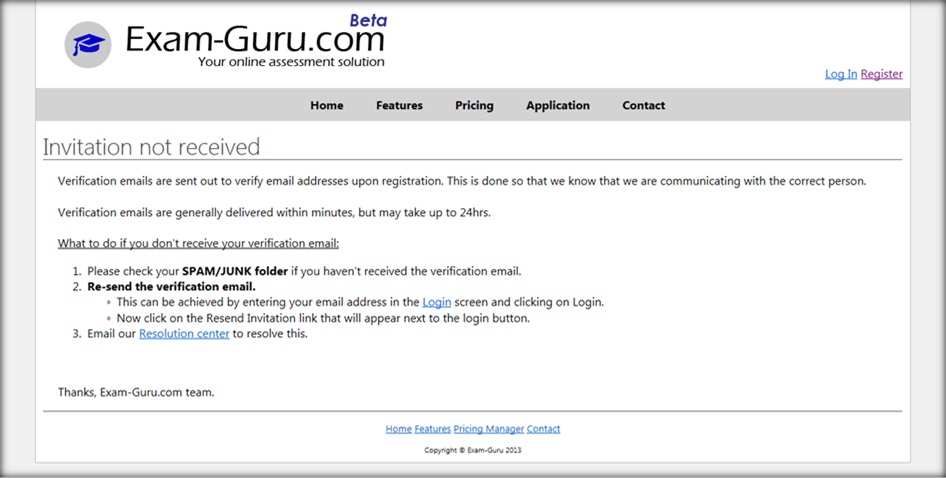
Fig 25.
Verification email has not been received after registering.

Fig 26.
The training tab is used to create training content for an exam.
Select an
exam on the left to create training.
Use the +
and – buttons to add/remove content items.
Three types
on Content can be created
·
“Display
content – Word Document” – A word document can be uploaded to the server and
served as viewable content.
·
“Hyperlink”
– An external link can be configured to point to an external website.
·
“Uploaded
file “ – A file can be uploaded to the server. These
files are available for the students to download.
The
envelope button is used to invite a student to view the training content.
To view training content, click on the “Click here to
preview contents” button. This will open up the Training content in the same
view that the student will see. Students can also see this button.
When logging in, a Training Content Viewer option is also
available to directly view the content without opening the Silverlight
application first.